Hướng Dẫn Web ESP32/ESP8266 NodeMCU Điều Khiển Module Relay
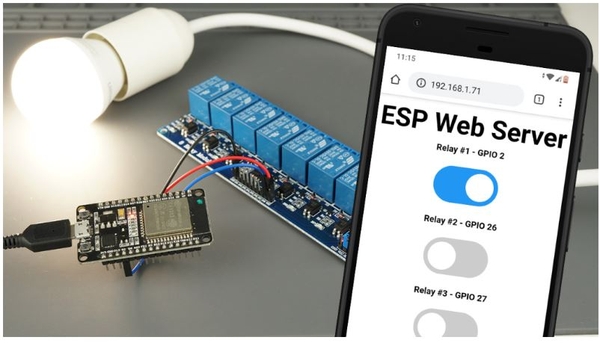
Hướng dẫn này sẽ giới thiệu cách xây dựng một máy chủ Web ESP32 hoặc ESP8266 NodeMCU độc lập để điều khiển bất kỳ mô-đun relay nào. Chúng ta sẽ tạo ra một máy chủ Web ESP32/ESP8266 có khả năng phản hồi trên điện thoại di động và có thể được truy cập bằng bất kỳ thiết bị nào có trình duyệt trong mạng cục bộ của bạn.
Máy chủ Web Relay ESP8266 NodeMCU sử dụng Arduino IDE 1 2 4 8 16 kênh Giới thiệu về Relay Relay là một công tắc được điều khiển bằng điện và giống như bất kỳ công tắc nào khác, nó có thể được bật hoặc tắt, cho phép dòng điện đi qua hoặc không. Nó có thể được điều khiển với điện áp thấp, như 3,3V được cung cấp bởi các chân GPIO của ESP và cho phép chúng ta kiểm soát điện áp cao như 12V, 24V hoặc điện áp lưới (230V ở châu Âu và 120V ở Mỹ).
Có các mô-đun relay khác nhau với số kênh khác nhau. Bạn có thể tìm thấy các mô-đun relay với một, hai, bốn, tám và thậm chí mười sáu kênh. Số kênh xác định số lượng đầu ra bạn có thể kiểm soát.
1. Chuẩn Bị
Kit Wifi NodeMcu ESP8266 CH340


2. Phần Mềm Code
Thư viện:
Kết Nối:

Code:
#include "ESP8266WiFi.h"
#include "ESPAsyncWebServer.h"

// Set to true to define Relay as Normally Open (NO)
#define RELAY_NO    true

// Set number of relays
#define NUM_RELAYS  5

// Assign each GPIO to a relay
int relayGPIOs[NUM_RELAYS] = {5, 4, 14, 12, 13};

// Replace with your network credentials
const char* ssid = "REPLACE_WITH_YOUR_SSID";
const char* password = "REPLACE_WITH_YOUR_PASSWORD";

const char* PARAM_INPUT_1 = "relay";
const char* PARAM_INPUT_2 = "state";

// Create AsyncWebServer object on port 80
AsyncWebServer server(80);

const char index_html[] PROGMEM = R"rawliteral(
<!DOCTYPE HTML><html>
<head>
  <meta name="viewport" content="width=device-width, initial-scale=1">
  <style>
    html {font-family: Arial; display: inline-block; text-align: center;}
    h2 {font-size: 3.0rem;}
    p {font-size: 3.0rem;}
    body {max-width: 600px; margin:0px auto; padding-bottom: 25px;}
    .switch {position: relative; display: inline-block; width: 120px; height: 68px}
    .switch input {display: none}
    .slider {position: absolute; top: 0; left: 0; right: 0; bottom: 0; background-color: #ccc; border-radius: 34px}
    .slider:before {position: absolute; content: ""; height: 52px; width: 52px; left: 8px; bottom: 8px; background-color: #fff; -webkit-transition: .4s; transition: .4s; border-radius: 68px}
    input:checked+.slider {background-color: #2196F3}
    input:checked+.slider:before {-webkit-transform: translateX(52px); -ms-transform: translateX(52px); transform: translateX(52px)}
  </style>
</head>
<body>
  <h2>ESP Web Server</h2>
  %BUTTONPLACEHOLDER%
<script>function toggleCheckbox(element) {
  var xhr = new XMLHttpRequest();
  if(element.checked){ xhr.open("GET", "/update?relay="+element.id+"&state=1", true); }
  else { xhr.open("GET", "/update?relay="+element.id+"&state=0", true); }
  xhr.send();
}</script>
</body>
</html>
)rawliteral";

// Replaces placeholder with button section in your web page
String processor(const String& var){
  //Serial.println(var);
  if(var == "BUTTONPLACEHOLDER"){
    String buttons ="";
    for(int i=1; i<=NUM_RELAYS; i++){
      String relayStateValue = relayState(i);
      buttons+= "<h4>Relay #" + String(i) + " - GPIO " + relayGPIOs[i-1] + "</h4><label class=\"switch\"><input type=\"checkbox\" onchange=\"toggleCheckbox(this)\" id=\"" + String(i) + "\" "+ relayStateValue +"><span class=\"slider\"></span></label>";
    }
    return buttons;
  }
  return String();
}

String relayState(int numRelay){
  if(RELAY_NO){
    if(digitalRead(relayGPIOs[numRelay-1])){
      return "";
    }
    else {
      return "checked";
    }
  }
  else {
    if(digitalRead(relayGPIOs[numRelay-1])){
      return "checked";
    }
    else {
      return "";
    }
  }
  return "";
}

void setup(){
  // Serial port for debugging purposes
  Serial.begin(115200);

  // Set all relays to off when the program starts - if set to Normally Open (NO), the relay is off when you set the relay to HIGH
  for(int i=1; i<=NUM_RELAYS; i++){
    pinMode(relayGPIOs[i-1], OUTPUT);
    if(RELAY_NO){
      digitalWrite(relayGPIOs[i-1], HIGH);
    }
    else{
      digitalWrite(relayGPIOs[i-1], LOW);
    }
  }

  // Connect to Wi-Fi
  WiFi.begin(ssid, password);
  while (WiFi.status() != WL_CONNECTED) {
    delay(1000);
    Serial.println("Connecting to WiFi..");
  }

  // Print ESP8266 Local IP Address
  Serial.println(WiFi.localIP());

  // Route for root / web page
  server.on("/", HTTP_GET, [](AsyncWebServerRequest *request){
    request->send_P(200, "text/html", index_html, processor);
  });

  // Send a GET request to <ESP_IP>/update?relay=<inputMessage>&state=<inputMessage2>
  server.on("/update", HTTP_GET, [] (AsyncWebServerRequest *request) {
    String inputMessage;
    String inputParam;
    String inputMessage2;
    String inputParam2;
    // GET input1 value on <ESP_IP>/update?relay=<inputMessage>
    if (request->hasParam(PARAM_INPUT_1) & request->hasParam(PARAM_INPUT_2)) {
      inputMessage = request->getParam(PARAM_INPUT_1)->value();
      inputParam = PARAM_INPUT_1;
      inputMessage2 = request->getParam(PARAM_INPUT_2)->value();
      inputParam2 = PARAM_INPUT_2;
      if(RELAY_NO){
        Serial.print("NO ");
        digitalWrite(relayGPIOs[inputMessage.toInt()-1], !inputMessage2.toInt());
      }
      else{
        Serial.print("NC ");
        digitalWrite(relayGPIOs[inputMessage.toInt()-1], inputMessage2.toInt());
      }
    }
    else {
      inputMessage = "No message sent";
      inputParam = "none";
    }
    Serial.println(inputMessage + inputMessage2);
    request->send(200, "text/plain", "OK");
  });
  // Start server
  server.begin();
}

void loop() {

}
3. Kết Quả